Saturday 28 July 2012

Screen Cast Using VLC Player

VLC is one of the best free video player one can have right now. And chances are that you already have it installed on your computer too. But VLC can be used for lot more than just watching those videos, movies, etc. You can even screen cast your Desktop using VLC so that you create those YouTube tutorials. All for free. So lets get started:


P.S. The following tutorial is made on Windows machine but the process is same for Linux and Mac VLC users.

1. The obvious one: Open VLC

2. Go to 'Media' menu and click on 'Convert/Save' or press Ctrl +R


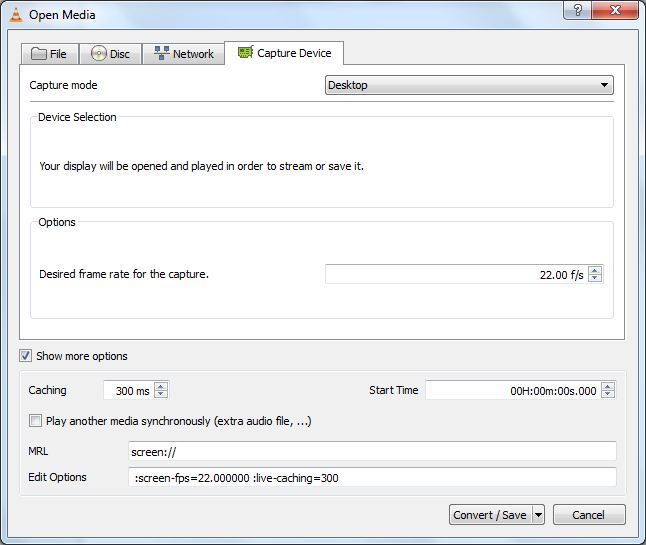
3. Click on the 'Capture Device' tab from the dialog box that opens and select the frame rate you want for your screen cast. The default 1 fps is very low so depending on your system, select the frame rate (Higher the Better). My computer is really SLOOOOOW so I'll set the fps at 22.00


4. Click on the 'Show more options' Checkbox to open up some more advanced features. If you are not much of an video editing guy you can choose this so the you don't have to add music to your video at the end of your screen cast. You can even run a video if you want. But the best thing about this is that you can start a screen cast after an interval. If you don't know the obvious use of this feature then let me break it to you "This feature can help you to spy on someone!"


5. Then just go to the 'Convert/Save' button. Make sure that you click on the drop down arrow and not the button other wise the default option will open up. From the menu select Convert. 


6. A new dialog box will open up in which you can select the destination for your Screen cast and some advance options like the Video container, Audio codec, Subtitles etc. by going to the Settings button (Wrench and the Screw Driver)


7. The final step is just to press 'Start'

Once the recording starts you can even Pause the screen cast if you don't want to miss Breaking Bad and also save your self from re-recording the whole thing again.
  

Wednesday 25 July 2012

Hide Your Zip Files Inside An Image Using Command Line

You must be having your personal data which you want to protect. But if you think adding a password or encrypting it makes it hard to access than you can try hiding your data in a image file. It is very easy and you don't even need to install any extra software. All you need to do is make a zip file of your data and find a image inside which we;ll be hiding your secrets, and as you can use your files from the zip file without "extracting", the data is very easily accessible. So lets get started:

First of all copy the image file to the location of your zip file for making the command easier. Then open your Command Prompt by pressing the Win + R keys and then typing cmd. Once the command prompt opens up, change the directory by typing cd and then paste the folder location of the image and file. For exmple:


 cd E:\Dropbox\Public\ 

Then type the following command by replacing the ZipFile.zip and Picture.gif with your zip and image file names. The NewFile.gif is the image file that will be created which has a zip file hidden inside


 copy /B Picture.gif+ZipFile.zip NewFile.gif 


And you are done creating a secret location for your Personal files.

Monday 23 July 2012

TweetDeck : Best Twitter Client


Twitter's official desktop app TweetDeck has finally come out of beta, and joins the website and mobile apps as part of the redesign of the service.

TweetDeck allows you to follow any number of Twitter and Facebook accounts you run in one columned application. The biggest change with this version of TweetDeck is it no longer installs through Adobe AIR, making getting started that little bit faster.

The appearance of TweetDeck is largely unchanged. It's clean and easy to understand, and still probably the best app for using multiple accounts. The default setting features a Home feed of updates from all your accounts together. Then there is the @Me feed, which shows all interactions with you on Twitter or Facebook. Finally there is an Inbox for Direct Messages in Twitter. You can add to any of these from a selection of things like Lists or Tweets, and remove any of them too.

TweetDeck is absolutely essential if you use more than one Twitter account. It's easy to use, and very clearly designed, with the added security of Twitter's official support. Making a real installer so Adobe AIR isn't required is a great improvement on earlier versions too.


Downloads: 
TweetDeck for Windows And Mac OS
TweetDeck for iOS
TweetDeck for Android
TweetDeck for Chrome


[Softonic]

Speed Up Your Slow PC


You must be felling that your computer is SLOOOOOOOW. Don't worry that's how almost every techy in the world feels like. But if you really want to speed up your machine with some small tweaks, it'll help you a lot in some situations.

Let's get stared:

1. Clean Up Your Disks

Doesn't matter whether it's your phone, PC, Laptop, or MP3 player , this step applies to all your electronics. Cleaning up your disks is very necessary, even though you fell that all the data on your computer is important, you'll have to let some of it go. To do this you can uninstall unwanted software that slow down your Windows StartUp, or defragment your disk using great utilites like Smart Defrag to get a little help. Read this article to know more how you can keep your data and still have lot of space on your system. One of the ways to do it is by creating a free DropBox, SkyDrive or Google Drive account to save your data online. Use this link to give me and yourself additional 500 MB space on your 2GB free account.

2. Install A Lighter OS

Install a lighter OS on your computer to get faster boot up speeds and lesser frustration. You can use some of the lightest linux distros to install onto your computer. You can even just make a live USB for your light distro if you dont want to go through the tough work of installing a whole new OS and it may still give comparatively faster application start ups and system boot ups. You can even install something like Chrome OS called Chromium OS if it is supported onto your system. Chromium OS is basically OS with just Chrome in it. You can use it if you just browse internet most of the time and as now a days you can do almost any thing online that you can do on your PC, Chromium Os can be used as an alternative.

3. Increase Internet Speeds

Just like every one else even you must be felling that your internet speeds can be improved and the answer is both yes and no. You can get a little more speed by the tricks I showed you earlier and you can even change your DNS settings using  to get an extra kick on you speed but at the end of the day your applications and your ISP (Internet Service Provider) decides how mush speed you get. You can try some tricks to crank up your DropBox upload and download speeds which really give you amazing syncing speed, but even this works only because DropBox was limiting your speed so don't search for trick to boost up Chrome or something like that, it WONT WORK!

4. Overclock Your System

This is something that I wont recommend to you if you are a newbie because overclocking your Processor, RAM, or GPU will void its warranty. The other problem with overclocking is that if you don't know the limits you can endup overheating your processor , blah, blah to such an extend that it will never work again. So be careful with that. Overclockers.com has some great tutorials but the best thing to do is gather information about your computer like Motherboard name, Processor name/generation, etc and then find if anyone with same spces have put on a tutorial by googling it.

5. Use Windows ReadyBoost

ReadyBoost is a great functionality already in your added in Windows OS' watch the video and read the explanation on Windows Site. There are some other Softwares like eBoost which can help you do the same but I don't see a need to install an extra software for ReadyBoost. But watch this video of eBoost it explains how  eBoost (ReadyBoost) works.


6. Get Yourself A SSD

Using an SSD will give you the best performance boost than any other tweaks mentioned above, but again all the above ones were for free. SSD replace come in various sizes and the size of SSD you'll need depends on your usage. If you are a PRO designer or something and you use very huge and memory consuming applications like PhotoShop and 3D's Max you'll need a SSD with slightly more space, but again it depends on how much you are able to giveup. If you don't want to spend too much on SSD and ready to wait a little more for an application to open up, you can save a whole lot of money. Have a look at this guide on How To Buy SSD on PCMag.com to understand your needs better.

Sunday 22 July 2012

Use Unlocker To Delete Viruses And Other Files That Even Your Antivirus Cannot Delete


Ever got this above message when you tried to delete a file even after your closed all the related programs? Don't worry every one gets this kind of message because that how Windows is. To delete with this kinds of files all you needs is a really small utility Unlocker that can delete, kill related process', rename files and lot more without a reboot. You can even delete files that your Antivirus was able to find but unable to delete it for some reason. 
Unlocker is very easy to use, All you need to do is select the file and then select the action you want to perform like delete, rename, etc.

Download:

Thursday 12 July 2012

WhoAreYou: Free Caller ID, SMS Blocking, Reverse Database Lookups On Android

You must be getting a lot of phone calls every day and most of them are from those annoying tele-marketer or if you  would just like to spy a little bit and look who is calling from where. Then this great app can give you a lot of information like the number, state and city from where the person is calling and if cannot access those kinds of information right now, then you can just ask the app to reverse check the number in its database. WhoAreYou doesn't even remove your default dial, it just pops up when you receive a call.

WhoAreYou


[LifeHacker]  

Monday 9 July 2012

Bitcasa: Get Unlimited Cloud Storage With Sync For FREE!

I came across this amazing service Bitcasa that provides you with unlimited cloud storage and that too for free. It is a start-up by 3 really smart guys. The technology stuffed into this system is also pretty amazing. 
If you are interested already, sign up through this link so that I get a referral (Don't why I need this as all the space is for FREE!)

The files or folders you upload are basically form one of the following type:

1. Infinite: 

The most awesome feature, if you upload a folder with Infinite category, then all the data from your computer will be uploaded onto your Bitcasa's unlimited storage and the Bitcasa system virtualizes that whole folder onto your system right from the cloud in real time. So whenever your try to see the folder properties you see something like:

And this is not because this is the cap on your account, its because this is the largest number the OS can show!
So what happens when you try to access those files in this INFINITE Folder?
Well even thought the files you see on your infinite folder are virtualized, you can still open them on your system without any problems. The data is brought onto your computer in real time. The founder was playing 2 HD movies simultaneously right from the cloud during his presentation. That's because the system can predict can automatically download the data in advance so that you can have an hassle free experience.

2. Sync:

You know all about this so I wont be wasting your time on this. This basically means that you have a copy of the file, both on your computer and the cloud. But the good thing about this is that with Bitcasa you can sync unlimited data without any limits unlike some other services that only let you sync a limited amount of data even though you have paid for larger amount of space.

3. Backup:

This is the category for all your permanent files. If you don't want to ever loose a file then keep them in here. It will keep a copy with you so that you can change and the other copy on the cloud that stays the same no matter what.  


Features of Bitcasa:


  • Apart from the cool Infinite folder and the infinite sync Bitcasa also allow you to access almost all of your daily usage files like videos, pdf's, text files, music etc. right in you browser. No need to download the fie, just steam your whole Movie from the cloud just like your own Netflix or iTunes.

  • You can even share the files and folders form both your Bitcasa account and even from your computer, all you need to do is just drag and drop any file or folder on the  Send Tab and it will create a link that the other person can open up in browser. 
  • I know that most of you will not consider this a Feature but, it really is. Bitcasa is truly a cross platform service available on Windows, Mac and even Linux. They are even going to come up with app for iOS and Android.